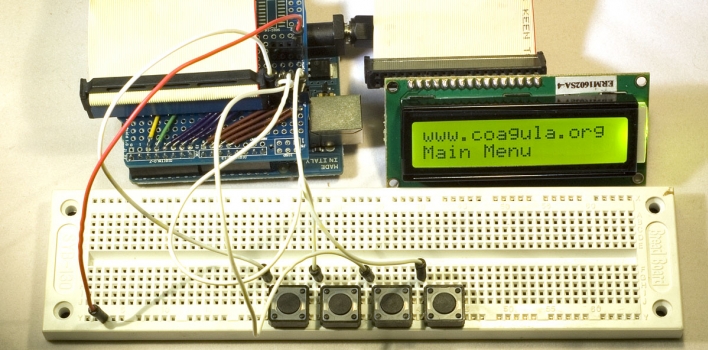
Lavorando al mio MIDI ribbon controller ho avuto la necessità di utilizzare un menu per poter configurare agevolmente i vari parametri, ma in giro per la rete ho trovato solo indicazioni su come gestire un menu, come gestire un display lcd, ma poco materiale relativo a come mettere insieme le due cose. Comunque grazie alla libreria Menubackend di Alexander Brevig sono riuscito a creare il menu che desideravo.
Prima di tutto ho scaricato la versione 1.4 della libreria di Alexander Brevig e l’ho modificata leggermente aggiungendo, alla riga 195 del file MenuBackend.h subito prima della riga con scritto “private:”, questo metodo:
void toRoot() {
setCurrent( &getRoot() );
}
Tale metodo mi serve per poter tornare agevolmente alla radice del menu.
Nel mio sketch ho quindi importato la libreria Menubackend così modificata e la libreria LiquidCrystal che è inclusa nell’IDE di Arduino.
La libreria MenuBackend permette di gestire un menu in maniera molto flessibile pensando ai collegamenti tra voci di menu come a degli incroci. Per creare la sruttura del menu si utilizzano dei metodi come addRight, addLeft, Add e AddBefore per aggiungere le varie voci a destra, sinistra, sotto o sopra le altre voci. Per navigare tra una voce e l’altra si utilizzano metodi intuitivi come moveLeft, moveRight, moveUp e moveDown. Nel mio esempio creo una struttura come la seguente.
Main
|
Item1——————————-Item2—————————————————-Item3
| |
Item1SubItem1—–Item1SubItem2 Item2SubItem1——Item2SubItem2——Item2SubItem3
MenuBackend innesca un evento ogni volta che cambia la voce di menu corrente e quindi l’ho sfruttato per “stampare” sul display lcd la voce del menu corrente. Inoltre viene innescato un altro evento quando viene selezionata una voce tramite il metodo “use”. Tale evento potrebbe essere sfruttato per esempio per modificare lo status dell’applicazione, ma in questo caso mi sono limitato a stampare sul display la frase “You used” seguita dal nome della voce di menu utilizzata.
Per navigare nel menu ho usato 4 pulsanti (Left, Right, Esc ed Enter). Se la voce corrente ha una sottovoce premendo il tasto Enter si “scende” su di essa, altrimenti viene innescato l’evento used. Con i tasti Left e Right si naviga tra le voci dello stesso “livello”, mentre con il tasto Esc si ritorna alla voce principale.
Per realizzare il progetto avete bisogno dei seguenti componenti:
- Scheda Arduino compatibile (dovrebbe andare bene anche la vecchia Arduino Diecimila)
- un display LCD compatibile Hitachi HD44780
- 4 pulsanti
- 4 resistenze da 10k
Opzionalmente per facilitarvi le connessioni potete sfruttare una scheda per i prototipi (protoshield). Io ne ho usata una della Nuelectronics.
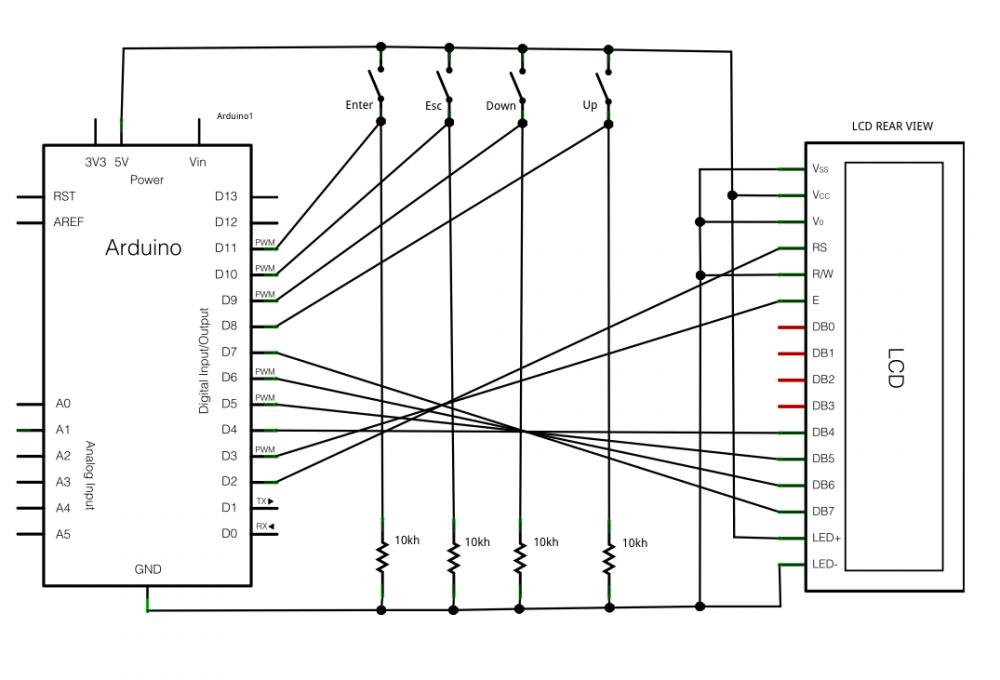
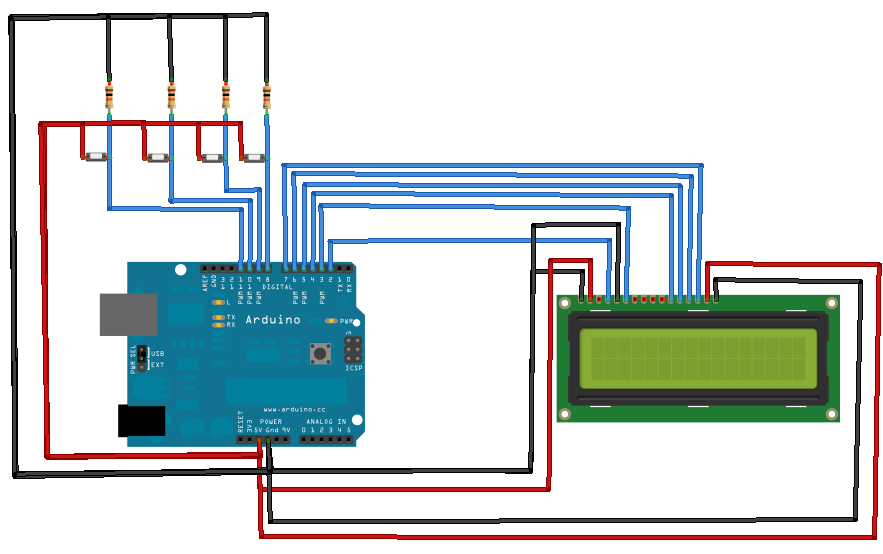
Lo schema elettrico è molto semplice. Ci sono 12 dei 16 pin del display lcd collegati alla scheda Arduino: 6 sono pin di input, 2 di alimentazione, 2 servono ad alimentare la luce interna, 1 per abilitare la scrittura (viene collegato al ground) e 1 per regolare il contrasto (anche questo a ground per avere sempre il massimo contrasto). I 4 pulsanti sono collegati a 4 pin di input di Arduino, a loro volta collegati a ground tramite resistenze da 10k. L’altro capo dei pulsanti è collegato ai 5v di Arduino.
Gli schemi sono realizzati con Fritzing
Per collegare il display lcd ad Arduino ho prima saldato due strip da 6 pin di tipo maschio sullo shield e poi, grazie a un’idea datami da Emanuel nei commenti di un altro post, ho sfruttato un vecchio cavo parallelo per hard disk IDE.
Aggiornamento: Come mi ha fatto notare Liudr per ragioni di sicurezza è meglio usare un cavo ide molto vecchio da 40 cavi invece del cavo a 80 cavi che ho utilizzato in queste foto.
Credo che questo tipo di struttura anche se molto semplice, visto che sfrutta una sola riga del display, possa essere utile in molte situazioni di gestione di menu tramite display lcd con Arduino, e comunque può essere utilizzata come base per altre modifiche.
Puoi scaricare il codice sorgente qui.
/*
Copyright Giuseppe Di Cillo (www.coagula.org)
Contact: dicillo@coagula.org
This program is free software: you can redistribute it and/or modify
it under the terms of the GNU General Public License as published by
the Free Software Foundation, either version 3 of the License, or
(at your option) any later version.
This program is distributed in the hope that it will be useful,
but WITHOUT ANY WARRANTY; without even the implied warranty of
MERCHANTABILITY or FITNESS FOR A PARTICULAR PURPOSE. See the
GNU General Public License for more details.
You should have received a copy of the GNU General Public License
along with this program. If not, see <http://www.gnu.org/licenses/>.
*/
/*
IMPORTANT: to use the menubackend library by Alexander Brevig download it at http://www.arduino.cc/playground/uploads/Profiles/MenuBackend_1-4.zip and add the next code at line 195
void toRoot() {
setCurrent( &getRoot() );
}
*/
#include <MenuBackend.h> //MenuBackend library – copyright by Alexander Brevig
#include <LiquidCrystal.h> //this library is included in the Arduino IDE
const int buttonPinLeft = 8; // pin for the Up button
const int buttonPinRight = 9; // pin for the Down button
const int buttonPinEsc = 10; // pin for the Esc button
const int buttonPinEnter = 11; // pin for the Enter button
int lastButtonPushed = 0;
int lastButtonEnterState = LOW; // the previous reading from the Enter input pin
int lastButtonEscState = LOW; // the previous reading from the Esc input pin
int lastButtonLeftState = LOW; // the previous reading from the Left input pin
int lastButtonRightState = LOW; // the previous reading from the Right input pin
long lastEnterDebounceTime = 0; // the last time the output pin was toggled
long lastEscDebounceTime = 0; // the last time the output pin was toggled
long lastLeftDebounceTime = 0; // the last time the output pin was toggled
long lastRightDebounceTime = 0; // the last time the output pin was toggled
long debounceDelay = 500; // the debounce time
// LiquidCrystal display with:
// rs on pin 2
// rw on PIN3
// enable on pin 6
// d4, d5, d6, d7 on pins 4, 5, 6, 7
LiquidCrystal lcd(2, 3, 4, 5, 6, 7);
//Menu variables
MenuBackend menu = MenuBackend(menuUsed,menuChanged);
//initialize menuitems
MenuItem menu1Item1 = MenuItem(“Item1”);
MenuItem menuItem1SubItem1 = MenuItem(“Item1SubItem1”);
MenuItem menuItem1SubItem2 = MenuItem(“Item1SubItem2”);
MenuItem menu1Item2 = MenuItem(“Item2”);
MenuItem menuItem2SubItem1 = MenuItem(“Item2SubItem1”);
MenuItem menuItem2SubItem2 = MenuItem(“Item2SubItem2”);
MenuItem menuItem3SubItem3 = MenuItem(“Item2SubItem3”);
MenuItem menu1Item3 = MenuItem(“Item3”);
void setup()
{
pinMode(buttonPinLeft, INPUT);
pinMode(buttonPinRight, INPUT);
pinMode(buttonPinEnter, INPUT);
pinMode(buttonPinEsc, INPUT);
lcd.begin(16, 2);
//configure menu
menu.getRoot().add(menu1Item1);
menu1Item1.addRight(menu1Item2).addRight(menu1Item3);
menu1Item1.add(menuItem1SubItem1).addRight(menuItem1SubItem2);
menu1Item2.add(menuItem2SubItem1).addRight(menuItem2SubItem2).addRight(menuItem3SubItem3);
menu.toRoot();
lcd.setCursor(0,0);
lcd.print(“www.coagula.org”);
} // setup()…
void loop()
{
readButtons(); //I splitted button reading and navigation in two procedures because
navigateMenus(); //in some situations I want to use the button for other purpose (eg. to change some settings)
} //loop()…
void menuChanged(MenuChangeEvent changed){
MenuItem newMenuItem=changed.to; //get the destination menu
lcd.setCursor(0,1); //set the start position for lcd printing to the second row
if(newMenuItem.getName()==menu.getRoot()){
lcd.print(“Main Menu “);
}else if(newMenuItem.getName()==”Item1”){
lcd.print(“Item1 “);
}else if(newMenuItem.getName()==”Item1SubItem1”){
lcd.print(“Item1SubItem1″);
}else if(newMenuItem.getName()==”Item1SubItem2”){
lcd.print(“Item1SubItem2 “);
}else if(newMenuItem.getName()==”Item2”){
lcd.print(“Item2 “);
}else if(newMenuItem.getName()==”Item2SubItem1”){
lcd.print(“Item2SubItem1 “);
}else if(newMenuItem.getName()==”Item2SubItem2”){
lcd.print(“Item2SubItem2 “);
}else if(newMenuItem.getName()==”Item2SubItem3”){
lcd.print(“Item2SubItem3 “);
}else if(newMenuItem.getName()==”Item3”){
lcd.print(“Item3 “);
}
}
void menuUsed(MenuUseEvent used){
lcd.setCursor(0,0);
lcd.print(“You used “);
lcd.setCursor(0,1);
lcd.print(used.item.getName());
delay(3000); //delay to allow message reading
lcd.setCursor(0,0);
lcd.print(“www.coagula.org”);
menu.toRoot(); //back to Main
}
void readButtons(){ //read buttons status
int reading;
int buttonEnterState=LOW; // the current reading from the Enter input pin
int buttonEscState=LOW; // the current reading from the input pin
int buttonLeftState=LOW; // the current reading from the input pin
int buttonRightState=LOW; // the current reading from the input pin
//Enter button
// read the state of the switch into a local variable:
reading = digitalRead(buttonPinEnter);
// check to see if you just pressed the enter button
// (i.e. the input went from LOW to HIGH), and you’ve waited
// long enough since the last press to ignore any noise:
// If the switch changed, due to noise or pressing:
if (reading != lastButtonEnterState) {
// reset the debouncing timer
lastEnterDebounceTime = millis();
}
if ((millis() – lastEnterDebounceTime) > debounceDelay) {
// whatever the reading is at, it’s been there for longer
// than the debounce delay, so take it as the actual current state:
buttonEnterState=reading;
lastEnterDebounceTime=millis();
}
// save the reading. Next time through the loop,
// it’ll be the lastButtonState:
lastButtonEnterState = reading;
//Esc button
// read the state of the switch into a local variable:
reading = digitalRead(buttonPinEsc);
// check to see if you just pressed the Down button
// (i.e. the input went from LOW to HIGH), and you’ve waited
// long enough since the last press to ignore any noise:
// If the switch changed, due to noise or pressing:
if (reading != lastButtonEscState) {
// reset the debouncing timer
lastEscDebounceTime = millis();
}
if ((millis() – lastEscDebounceTime) > debounceDelay) {
// whatever the reading is at, it’s been there for longer
// than the debounce delay, so take it as the actual current state:
buttonEscState = reading;
lastEscDebounceTime=millis();
}
// save the reading. Next time through the loop,
// it’ll be the lastButtonState:
lastButtonEscState = reading;
//Down button
// read the state of the switch into a local variable:
reading = digitalRead(buttonPinRight);
// check to see if you just pressed the Down button
// (i.e. the input went from LOW to HIGH), and you’ve waited
// long enough since the last press to ignore any noise:
// If the switch changed, due to noise or pressing:
if (reading != lastButtonRightState) {
// reset the debouncing timer
lastRightDebounceTime = millis();
}
if ((millis() – lastRightDebounceTime) > debounceDelay) {
// whatever the reading is at, it’s been there for longer
// than the debounce delay, so take it as the actual current state:
buttonRightState = reading;
lastRightDebounceTime =millis();
}
// save the reading. Next time through the loop,
// it’ll be the lastButtonState:
lastButtonRightState = reading;
//Up button
// read the state of the switch into a local variable:
reading = digitalRead(buttonPinLeft);
// check to see if you just pressed the Down button
// (i.e. the input went from LOW to HIGH), and you’ve waited
// long enough since the last press to ignore any noise:
// If the switch changed, due to noise or pressing:
if (reading != lastButtonLeftState) {
// reset the debouncing timer
lastLeftDebounceTime = millis();
}
if ((millis() – lastLeftDebounceTime) > debounceDelay) {
// whatever the reading is at, it’s been there for longer
// than the debounce delay, so take it as the actual current state:
buttonLeftState = reading;
lastLeftDebounceTime=millis();;
}
// save the reading. Next time through the loop,
// it’ll be the lastButtonState:
lastButtonLeftState = reading;
//records which button has been pressed
if (buttonEnterState==HIGH){
lastButtonPushed=buttonPinEnter;
}else if(buttonEscState==HIGH){
lastButtonPushed=buttonPinEsc;
}else if(buttonRightState==HIGH){
lastButtonPushed=buttonPinRight;
}else if(buttonLeftState==HIGH){
lastButtonPushed=buttonPinLeft;
}else{
lastButtonPushed=0;
}
}
void navigateMenus() {
MenuItem currentMenu=menu.getCurrent();
switch (lastButtonPushed){
case buttonPinEnter:
if(!(currentMenu.moveDown())){ //if the current menu has a child and has been pressed enter then menu navigate to item below
menu.use();
}else{ //otherwise, if menu has no child and has been pressed enter the current menu is used
menu.moveDown();
}
break;
case buttonPinEsc:
menu.toRoot(); //back to main
break;
case buttonPinRight:
menu.moveRight();
break;
case buttonPinLeft:
menu.moveLeft();
break;
}
lastButtonPushed=0; //reset the lastButtonPushed variable
}

Tutorial: come gestire menu e display LCD con Arduino by Giuseppe Di Cillo – Coagula.org is licensed under a Creative Commons Attribuzione – Non commerciale – Condividi allo stesso modo 3.0 Unported License.


